How to do a two tunnel hop in WinSCP
This situation might not come up all that too often, but I found one instance where I needed to do it, so this is a quick write up on how to perform a two tunnel hop using WinSCP so you can easily do a file transfer to a remote server you can't directly access.
In this example we are trying to connect to server final.example.com as the user anotheruser but the machine we're using cannot directly connect to it, only the serversecond.example.com can directly connect to it, but we're also unable to connect directly to second.example.com. second.example.com can only be connected to from the server first.example.com.
We would have to perform a hop like so:
- We connect to
first.example.comas useruser. first.example.comconnects tosecond.example.comas useruser.second.example.comconnects to the final serverfinal.example.comas useranotheruser.
If you were just wanting to SSH into final.example.com using the command-line, you could easily setup your user's ssh config file ~/.ssh/config like so. This is assuming you are using key based authentication.
Host first-server
  HostName first.example.com
  User user
  Port 22
  IdentityFile ~/.ssh/ssh_key

Host second-server
  HostName second.example.com
  User user
  Port 22
  IdentityFile ~/.ssh/ssh_key
  ProxyJump first-server

Host final-server
  HostName final.example.com
  User anotheruser
  Port 22
  IdentityFile ~/.ssh/ssh_key
  ProxyJump second-server
Then you would just connect by using the command ssh final-server.
Since you're wanting to use WinSCP, this isn't as straight forward since you can only define a single SSH Tunnel in your WinSCP site settings but it is doable by using a Local Proxy Command and then defining an SSH Tunnel in the site's settings in WinSCP.
The first hop will use the Local Proxy Command and plink to connect to first.example.com, the second hop will use the Tunnel to connect to second.example.com and the final connection to final.example.com is defined as the actual host of the site in WinSCP.
When you do this using the Local Proxy Command, you cannot use any sort of interactive authentication, so if you're using password authentication when connecting to first.example.com you will need to specify the password to plink using the -pw switch. The recommendation is to use Pagent for public key authentication to the server first.example.com.
You will configure the site in WinSCP like below.
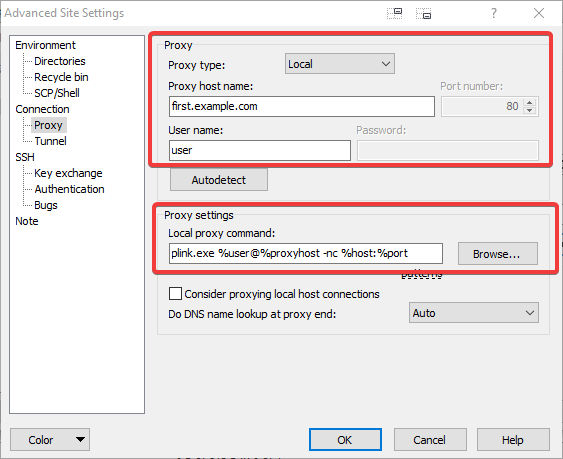
First Hop
This is the first server you are connecting to, in our case `first.example.com' and this is configured on the Proxy page of the Advanced site settings for your site.
- Proxy type:
Local - Proxy host name:
first.example.com - User name:
user - Local proxy command:
plink.exe %user@%proxyhost -nc %host:%port
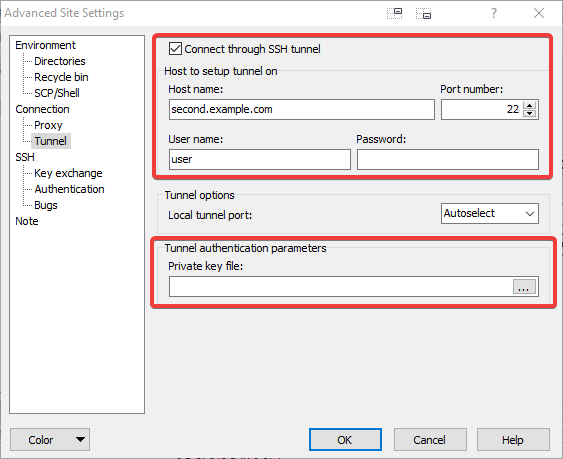
Second Hop
This is the second server you are connecting to, in our case `second.example.com' and this is configured on the Tunnel page of the Advanced site settings for your site.
- Connect through SSH tunnel:
Checked - Host name:
second.example.com - User name:
user - Password: You can specify a password if not using a private key.
- Private key file: Specify your private key file if you're using key based authentication.
Final Hop
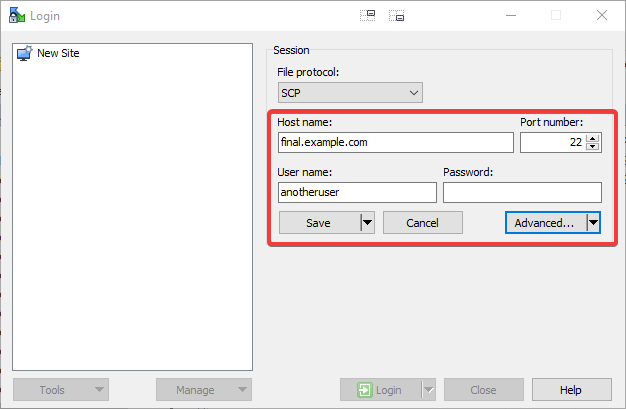
The final hop is the connection to the final server we're trying to connect to, which in our case is final.example.com as the user anotheruser. The connection information for this server is defined on the Login dialog for the WinSCP site.
- File protocol:
SFTPorSCP - Host name:
final.example.com - User name:
anotheruser - Password: You can specify a password if not using a private key.
- Private key: If you're using a private key, you will need to specify that key in the Advanced settings dialog for this site under
SSH->Authentication.