How to create a valid self-signed SSL certificate for your internal services using PowerShell
If you're sick of seeing certificate errors when you try to access your internal services, and you would like to use valid SSL certificates but since these services are all internal and are not exposed to the internet, you don't want to use a reverse proxy and something like a DNS challenge in order to get some LetsEncrypt certificates, then you can simply just create a self-signed certificate for the host, internal domain or IP address.
You can easily do this using OpenSSL and there are tons of guides out there for doing this with OpenSSL specifically, so this will only cover how to create a basic self-signed SSL certificate for use with an internal service using PowerShell.
You will need to keep the root CA certificate's private key and self-signed certificate's private keys secure and ensure that you use a strong password when creating the private keys. If someone gets a hold of your root CA certificate's private key or self-signed certificate's private keys, they can create certificates using them and those certificates will inherently be trusted.
There will be three different things covered:
- Creating a self-signed SSL certificate. This will only use the DNS name or a domain name.
- Creating a self-signed SSL certificate using both the DNS name and an IP address.
- Creating and using a self-signed root authority certificate to sign your certificates so you only need the root authority certificate installed on your machine.
- Installing the self-signed certificate or self-signed root authority certificate on your machine.
Note
Some of the PowerShell scripts below are using splatting to pass parameters to the different cmdlets.
You'll be able to tell if the parameters are using splatting if they are defined has a hash table, like so:
$params = @{
  DnsName = @("DEVSERVER","DEVSERVER.local")
  FriendlyName = "Test Self-Signed Cert"
}
$cert = New-SelfSignedCertificate @params
Instead of defined using the actual cmdlet's parameters, like so:
$cert = New-SelfSignedCertificate -DnsName @("DEVSERVER","DEVSERVER.local") -FriendlyName "Test Self-Signed Cert"Create a basic self-signed certificate
This will be the most basic certificate, and it will not be signed by any root authority certificate, and will need to be installed into the Trusted Root Certification Authorities store on any machine that will access a service using this certificate.
In this example, the server that contains the internal service that will need to use this certificate is called DEVSERVER and has a basic FQDN of DEVSERVER.local. We are executing these scripts on DEVSERVER in a PowerShell console that is elevated to Administrator. This assumes these are all being executed in the same console since the new certificate will be saved to the $cert variable which is used when exporting the certificate to disk.
This set of scripts will create a new self-signed certificate that will expire in 15 years, with the friendly name Test Self-Signed Cert, a subject of CN=TestCert,O=TestCert,OU=TestCert, and is set to be valid for the DNS names DEVSERVER and DEVSERVER.local. The certificate will be automatically added to the Local Computer's Personal certificate store and then will be exported the certificate to the file TestCert.cer in the current directory.
Create the certificate
First lets create a new self-signed certificate and assign it to the variable $cert by executing the script below:
$params = @{
  DnsName = @("DEVSERVER","DEVSERVER.local")
  Subject = "CN=TestCert,O=TestCert,OU=TestCert"
  FriendlyName = "Test Self-Signed Cert"
  KeyLength = 4096
  KeyAlgorithm = 'RSA'
  HashAlgorithm = 'SHA256'
  KeyExportPolicy = 'Exportable'
  NotAfter = (Get-Date).AddYears(15)
  CertStoreLocation = "Cert:\LocalMachine\My"
}
$cert = New-SelfSignedCertificate @params
If you wished, you could use a wildcard and add in *.DEVSERVER.local as well by changing the DnsName array in $params to contain the wildcard:
DnsName = @("DEVSERVER","DEVSERVER.local", "*.DEVSERVER.local")You can execute the command below to see the properties of the newly created certificate:
$cert | Format-List -Property *You can see below that the DnsNameList property contains both of the hostnames used.

Export Certificate to Disk
You will want to export this certificate to disk, so we will export it to disk as the file TestCert.cer in the current directory by executing the command:
Export-Certificate -Cert $cert -FilePath "TestCert.cer" -Type CERTView in the Certificates Store
You can launch mmc.exe and from File->Add or Remove Snap-ins add the Certificates then Local Computer snap-in to see that this certificate was added to the Local Computer\Personal\Certificatesstore on the computer where the PowerShell script was ran.

Set Service to use the Certificate
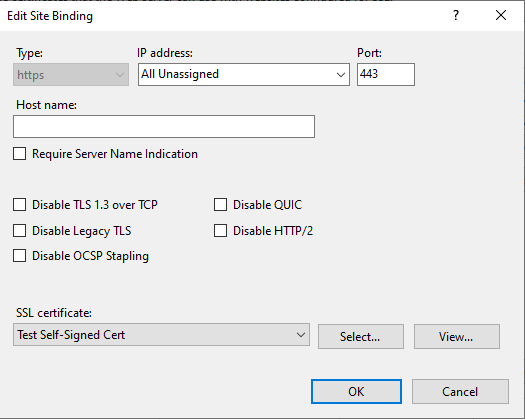
For simplicity, we will use IIS as the internal service, and we will set the Default Web Site to use this Test Self-Signed Cert as it's HTTPS certificate.
Import the Certificate on machines
Any machine that will access this service will need to import this certificate into their Trusted Root Certification Authorities store, even the same server the service is installed on.
You can do this by running this PowerShell command on the machine and point the value of -FilePath to the location of the TestCert.cer file:
Import-Certificate -FilePath "TestCert.cer" -CertStoreLocation Cert:\LocalMachine\RootIf you wanted to import the certificate into the current user's Trusted Root Certification Authorities store instead of the local machine, you can execute this:
Import-Certificate -FilePath "TestCert.cer" -CertStoreLocation Cert:\CurrentUser\RootTest Connection
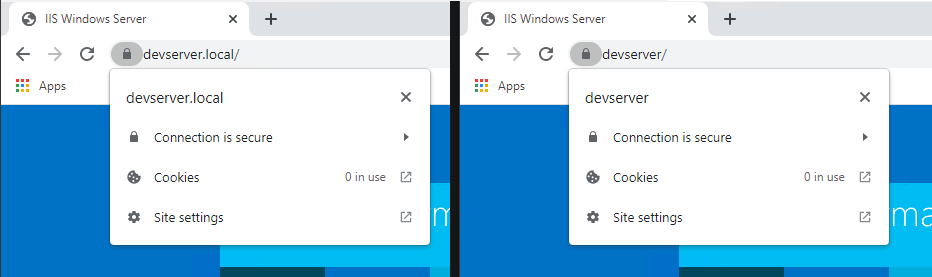
Now when you restart your browser and go to the service by using either https://devserver/ or https://devserver.local, we no longer receive a certificate error!
Sample Script
Below is a complete sample script that will create a basic self-signed certificate like above:
<#
.SYNOPSIS
    Creates a basic self-signed certificate for the specified host names.

.DESCRIPTION
    Creates a basic self-signed certificate for the specified host names.

.NOTES
    Author:         jpann [at] impostr-labs.com
    Filename:     	Create-SelfSignedCertBasic.ps1
    Created on:   	03-15-2022
    Version:        1.1
    Last updated:   11-03-2022
#>

$certFriendlyName = "Test Self-Signed Cert"
$certFileName = "TestCert.cer"

$certDomains = @('DEVSERVER', 'DEVSERVER.local')
$certIPAddresses = @('192.168.2.3')

function Check-IsElevated {
    $id = [System.Security.Principal.WindowsIdentity]::GetCurrent()
    $p = New-Object System.Security.Principal.WindowsPrincipal($id)

    if ($p.IsInRole([System.Security.Principal.WindowsBuiltInRole]::Administrator)) {
        Write-Output $true
    } else {
        Write-Output $false
    }
}

if (-not(Check-IsElevated)) {
    throw "Please run this script as an administrator"
}

Write-Host "Creating self-signed certificate called '$certFriendlyName' in LocalMachine\Personal store..."
$params = @{
  DnsName = $certDomains
  Subject = $certFriendlyName
  FriendlyName = $certFriendlyName
  KeyLength = 4096
  KeyAlgorithm = 'RSA'
  HashAlgorithm = 'SHA256'
  KeyExportPolicy = 'Exportable'
  NotAfter = (Get-Date).AddYears(15)
  CertStoreLocation = "Cert:\LocalMachine\My"
}
$cert = New-SelfSignedCertificate @params

# Export certificate to disk in the current user's home directory
if ($PSScriptRoot -ne $HOME) {
    cd $HOME;
}

$certFileName = Join-Path $HOME $certFileName

Write-Host "Exporting certificate to '$certFileName'..."
Export-Certificate -Cert $cert -FilePath "$certFileName" -Type CERT

Write-Host "Importing certificate into local Trusted Root Certification Authorities..."
Import-Certificate -FilePath "$certFileName" -CertStoreLocation Cert:\LocalMachine\Root
Create-SelfSignedCertBasic.ps1
Create a self-signed certificate that works with an IP address
What if you also want a secure connection when you're connecting to a server using it's IP address instead of a hostname or domain? We do this using a Subject Alternative Name when we create the certificate by using New-SelfSignedCertificate's -TextExtension parameter instead of the -DnsName parameter, like so:
-TextExtension @("2.5.29.17={text}IPAddress=192.168.2.3&DNS=DEVSERVER&DNS=DEVSERVER.local")Create the Certificate
We will create this certificate with the filename TestCertWithIP.cer and this certificate will use the same hostnames as the previous certificate but will add the server's IP address of 192.168.2.3, which will now be added to the certificate's Subject Alternative Name.
The script below will create this self-signed certificate that also works with the IP address 192.168.2.3:
$params = @{
  FriendlyName = "Test with IP Self-Signed Cert"
  TextExtension = @("2.5.29.17={text}IPAddress=192.168.2.3&DNS=DEVSERVER&DNS=DEVSERVER.local")
  KeyLength = 4096
  KeyAlgorithm = 'RSA'
  HashAlgorithm = 'SHA256'
  KeyExportPolicy = 'Exportable'
  NotAfter = (Get-Date).AddYears(15)
  CertStoreLocation = "Cert:\LocalMachine\My"
}
$cert = New-SelfSignedCertificate @params
Export the Certificate to disk
Like the other certificate, we will export it to disk as the file TestCertWithIP.cer in the current directory by executing the command:
Export-Certificate -Cert $cert -FilePath "TestCertWithIP.cer" -Type CERTSet Service to use the Certificate
Now you can configure your service to use this Test with IP Self-Signed Cert certificate.
Import the Certificate on machines
Import the certificate into the local machine's Trusted Root Certification Authorities store:
Import-Certificate -FilePath "TestCertWithIP.cer" -CertStoreLocation Cert:\LocalMachine\RootImport the certificate into the current user's Trusted Root Certification Authorities store:
Import-Certificate -FilePath "TestCertWithIP.cer" -CertStoreLocation Cert:\CurrentUser\RootTest Connection
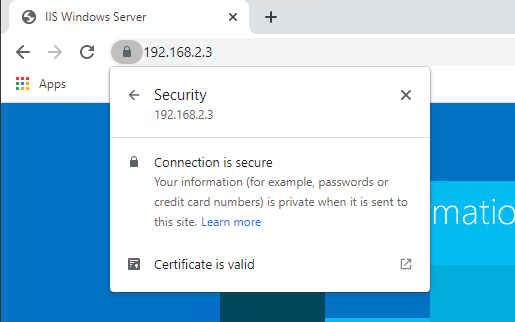
Now when you restart your browser and go to the service by using the IP Address https://192.168.2.3/ or the host names, we no longer receive a certificate error!
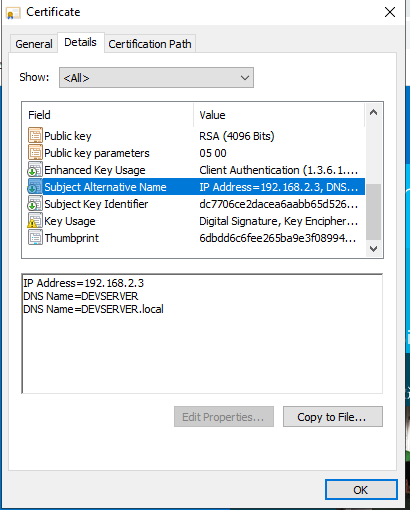
If you were to view the details of the certificate you would be able to see that the Subject Alternative Name now includes the IP address in addition to the host names.
Sample Script
Below is a complete sample script that will create a self-signed certificate for an IP address like above but is a little bit configurable:
<#
.SYNOPSIS
    Creates a self-signed certificate for the specified host names and IP addresses.

.DESCRIPTION
    Creates a self-signed certificate for the specified host names and IP addresses.

.NOTES
    Author:         jpann at impostr-labs.com
    Filename:       Create-SelfSignedCertForIP.ps1
    Created on:   	03-15-2022
    Version:        1.1
    Last updated:   11-03-2023
#>

$certFriendlyName = "Test with IP Self-Signed Cert"
$certFileName = "TestCertWithIP.cer"

$certDomains = @('DEVSERVER', 'DEVSERVER.local')
$certIPAddresses = @('192.168.2.3')

function Check-IsElevated {
    $id = [System.Security.Principal.WindowsIdentity]::GetCurrent()
    $p = New-Object System.Security.Principal.WindowsPrincipal($id)

    if ($p.IsInRole([System.Security.Principal.WindowsBuiltInRole]::Administrator)) {
        Write-Output $true
    } else {
        Write-Output $false
    }
}

if (-not(Check-IsElevated)) {
    throw "Please run this script as an administrator"
}

$subjectAltName = "2.5.29.17={text}"
$subjectAltName = $subjectAltName + (&{if($certDomains) { "DNS=" + ($certDomains -Join "&DNS=") + (&{if($certIPAddresses) { "&" }}) }}) + (&{if($certIPAddresses) { "IPAddress=" + ($certIPAddresses -Join "&IPAddress=") }})

Write-Host "Creating self-signed certificate called '$certFriendlyName' in LocalMachine\Personal store..."
$params = @{
  FriendlyName = $certFriendlyName
  TextExtension = @("$subjectAltName")
  KeyLength = 4096
  KeyAlgorithm = 'RSA'
  HashAlgorithm = 'SHA256'
  KeyExportPolicy = 'Exportable'
  NotAfter = (Get-Date).AddYears(15)
  CertStoreLocation = "Cert:\LocalMachine\My"
}
$cert = New-SelfSignedCertificate @params

# Export certificate to disk in the current user's home directory
if ($PSScriptRoot -ne $HOME) {
    cd $HOME;
}

$certFileName = Join-Path $HOME $certFileName

Write-Host "Exporting certificate to '$certFileName'..."
Export-Certificate -Cert $cert -FilePath "$certFileName" -Type CERT

Write-Host "Importing certificate into local Trusted Root Certification Authorities..."
Import-Certificate -FilePath "$certFileName" -CertStoreLocation Cert:\LocalMachine\Root
Create-SelfSignedCertForIP.ps1
Create and use a self-signed root authority certificate
Creating self-signed certificates using the methods above is handy but it can quickly become a bit of a hassle having to install each certificate on to your various machines/devices. Instead, you can create a self-signed root authority certificate and private key. You would add the root authority certificate to each machine and you will sign each self-signed certificate you create with this root authority certificate and private key so they are inherently trusted.
You will need to keep the root CA certificate's private key and self-signed certificate's private keys secure and ensure that you use a strong password when creating the private keys.
We will be doing the following:
- Create a root CA certificate with the friendly name
Test Root CA Certthat does not expire for 15 years and save it to the variable$rootCACert - Add the root CA certificate to the local machine's personal certificate store
- Get the thumbprint for the root CA certificate so we can use that when exporting the public and private keys
- Set the password for the root CA certificate's private key to
MyPassword - Export the root CA certificate's private key to disk as
TestrootCACert.pfx - Export the root CA certificate's public key to disk as
TestRootCACert.cer - Create a self-signed certificate for
DEVSERVER,DEVSERVER.localand192.168.2.3that does not expire for 15 years. - Sign the new self-signed with the root CA certificate
- Install the root CA Certificate on our machine
Create the Root CA Certificate
We will create a new root CA Certificate with the friendly name Test Root CA Cert, set it not to expire for 15 years and set other parameters that allow it to be exported and also used to sign other certificates.
$rootCAParams = @{
  FriendlyName = "Test Root CA Cert"
  DnsName = "Test Root CA Cert"
  Subject = "CN=TestRootCA,O=TestRootCA,OU=TestRootCA"
  KeyLength = 4096
  KeyAlgorithm = 'RSA'
  HashAlgorithm = 'SHA256'
  KeyExportPolicy = 'Exportable'
  KeyUsage = 'CertSign','CRLSign','DigitalSignature'
  KeyUsageProperty = 'All'
  NotAfter = (Get-Date).AddYears(15)
  Provider = 'Microsoft Enhanced RSA and AES Cryptographic Provider'
  CertStoreLocation = "Cert:\LocalMachine\My"
}

$rootCACert = New-SelfSignedCertificate @rootCAParams
Export the Root CA Certificate's Private Key
In order to export the root CA certificate's private key, we need to get the thumbprint for the root CA certificate and assign a password for the private key.
Get the the thumbprint for the root CA certificate from the variable $rootCACert:
# We need to the thumbprint of the Root CA Certificate in order to export the private key
$rootCAThumbprint = $rootCACert.Thumbprint
You will need to choose a password, but in our example we will be using MyPassword:
# Set the password that will be used for the Root CA Certificate's private key
$rootCACertPassword = ConvertTo-SecureString -String "MyPassword" -Force –AsPlainText
We can now export the root CA certificate's private key to disk as the file TestRootCACert.pfx:
# Export the Root CA Certificate's private key
Export-PfxCertificate -Cert Cert:\LocalMachine\My\$rootCAThumbprint -FilePath "TestRootCACert.pfx" -Password $rootCACertPassword
Export the Root CA Certificate to disk
We will now export the root CA certificate's public key to disk as TestRootCACert.cer:
# Export the Root CA Certificate's public key
Export-Certificate -Cert $rootCACert -FilePath "TestRootCACert.cer" -Type CERT
Create and sign the self-signed Certificate
Now that we have a root CA authority certificate created and installed on our machine, we can create self-signed certificates that are signed by that root CA certificate.
Get root CA certificate
If you're still in the same PowerShell session that created the root CA certificate, you can reuse the $rootCACert variable but if you're using a different PowerShell session you will need to get the previously created root CA certificate using it's Friendly Name and save it to the $rootCACert variable, like so:
$rootCACert = Get-ChildItem Cert:\LocalMachine\My | where{$_.FriendlyName -eq 'Test Root CA Cert'}Create a self-signed certificate and sign with root CA certificate
In the same PowerShell session we will create a new self-signed certificate for DEVSERVER, DEVSERVER.local and 192.168.2.3 that does not expire for 15 years, and sign it with the root CA certificate we created earlier.
This will create the certificate using the friendly name Test DEVSERVER Self-Signed Cert:
$cert = New-SelfSignedCertificate `
  -Subject "Test DEVSERVER Self-Signed Cert" `
  -TextExtension @("2.5.29.17={text}IPAddress=192.168.2.3&DNS=DEVSERVER&DNS=DEVSERVER.local") `
  -FriendlyName "Test DEVSERVER Self-Signed Cert" `
  -Signer $rootCACert `
  -KeyLength 4096 `
  -KeyAlgorithm 'RSA' `
  -HashAlgorithm 'SHA256' `
  -KeyExportPolicy 'Exportable' `
  -NotAfter (Get-Date).AddYears(15) `
  -CertStoreLocation Cert:\LocalMachine\My
Export the self-signed certificate's Public Key
We will export the public key to disk as TestDEVSERVERCert.cer:
Export-Certificate -Cert $cert -FilePath "TestDEVSERVERCert.cer" -Type CERTExport the self-signed certificate's Private Key
In order to export the self-signed certificate's private key, we need to provide the password used for the root CA certificate, which in our example was MyPassword:
$ca_password = ConvertTo-SecureString -AsPlainText -Force -String "MyPassword"We will export the private key to disk as TestDEVSERVERCert.pfx:
Export-PfxCertificate -Cert $cert -FilePath "TestDEVSERVERCert.pfx" -Password $ca_passwordSet Service to use Self-Signed Certificate Signed by the Root CA Certificate
Set whatever service you are using the use the Test DEVSERVER Self-Signed Cert self-signed certificate.
Import the Root CA Certificate on machines
Import the root CA certificate into the local machine's Trusted Root Certification Authorities store:
# Local Machine's Trusted Root Certification Authorities store
Import-Certificate -FilePath "TestRootCACert.cer" -CertStoreLocation Cert:\LocalMachine\Root
Import the root CA certificate into the current user's Trusted Root Certification Authorities store:
# Current user's Trusted Root Certification Authorities store
Import-Certificate -FilePath "TestRootCACert.cer" -CertStoreLocation Cert:\CurrentUser\Root